Review of Snapsack: Ready, snap, go!

Vera’s at a stage where she loves dressing up and experimenting with accessories. A girly and rather vain stage, which I guess is pretty normal for little girls.

So when we were greeted by this snap and decorate bag from Snapsack, she couldn’t wait to get started on the crafting.

snapsack - crafty bags for crafty girls

snapsack happy bags

snapsack party

As you can see, the little girls all had a blast decorating their own little bags. The mummies were very proud too. ;)

Each Snapsack handbag costs $55. If you ask me, I think the price is pretty steep. But if you have a little girl who loves crafting and decorating, it might be a worthwhile gift to get. Especially since you can keep changing and updating the pockets to suit your mood and style!

Snapsack also supports Room to Read, an organisation that seeks to transform the lives of children in the developing world by collaborating with local communities, partners and governments to develop literacy skills among girls and supporting them through their secondary school education.

Disclaimer: We received a Snapsack handbag when we attended their Singapore launch event. All opinions and photos are my own.

Handmade mother’s day cards and gift tags {Fund-raiser for MINDS}

Some of you know I’m involved in a handmade for charity project.

We are raising funds for MINDS by selling handmade cards and tags.

Here is my latest batch of cards for mother’s day (coming up next month)!

mother's day cardSold

Sold

Sold

These 6×6 cards come with white envelopes. I also have some gift / encouragement tags too. These are made using coasters and pretty paper, windmills and lotsa love. ;)

gift tags All sold, except B1 and B3

 B9 sold

All these are going for $2.50 each (not inclusive of postage), which is a steal if you ask me. LOL.

Just leave me a comment or email me at [email protected] for orders.

Thanks for supporting our cause! :D

Check out the designs made by other mums:

Little Lessons: Valentine’s day craft and learning about extravagant love

This week’s little lessons is inspired by a craft I first saw at education.com.

I adapted it with materials that I found around the house.

valentine craft

love bug DIY craft
1) Cut out a heart shape using red or pink card stock. Tip: the heart should be about the size of your palm or smaller. The paper should ideally be more than 120gsm as this will help the bug to “stand” better. (Ours was a tad flimsy and could barely support the weight of the ping pong!)

2) Write a simple love message on the heart.

3) Decorate the ping pong ball with red or black paper, making a smiley face.

4) Cut pipecleaner into one-inch legs. Fold each leg to make a right angle. Glue one end of the leg to the bottom of the paper heart. Your love-bug can have six or eight legs, depending on you. Tip: It can get messy glueing the legs as you need to hold it in place for a few minutes while it dries to ensure it stays upright.

5) Glue the head onto the tip of the heart. Voila! Get bitten by the love bug! :)

While doing the craft, I spoke to the kids about Valentine’s day and explained that it’s a day where we express our love to those we love.

After saying that I realised how silly that may sound to them since they express their love to us every day, day in day out. (And we to them too.)

Especially like how they rush to the door with peals of excitement whenever daddy comes home. Or how they give us a giant hug out of the blue. And those unexpected “i-love-you’s”

Their acts of child-like love are so full and real and extravagant. Sometimes I think they put us to shame. Perhaps it’s because they have no fear of what people might think. Or that they haven’t learnt to inhibit their behaviour according to social norms.

Perhaps it’s also because they know that we love them, and they feel safe expressing their love to us.

When I see them loving us so richly, I’m inspired to love them more, and to express my love to them in similarly extravagant ways too.

For them, every day must be Valentine’s day.

What are some of your favourite ways of loving and showing love to your children? :)

Little Lessons linky is open. Do link up your everyday lessons and learning activities here!

mamawearpapashirt

<div align="center"><a href="http://www.mamawearpapashirt.com/category/little-lessons-2/" title="mamawearpapashirt" target="_blank"><img src="http://www.mamawearpapashirt.com/wp-content/uploads/2013/09/Little-Lessons.jpg" alt="mamawearpapashirt" style="border:none;" /></a></div>

How to make paper snowflakes

We made paper snowflakes recently.

I started by folding a square piece of white paper using the instructions here. (Note: the folding in thirds part may look a bit complex, but after the first try, it’s actually quite simple). Then randomly cut out small triangles and other shapes from the folded piece.

Here’s what this snowflake design looks like when still folded.

I unfolded the paper from time to time to see the progress and to understand how each cut made a different pattern on the snowflake.

Then I got the kids to paint the snowflakes, and let them dry. After they were dry, we ran glue tape over the surface and sprinkled red sparkles all over. (I tried to get silver sparkles but alas Popular seemed to have run out.)

After the sparkles have set (gotta shake the snowflakes a little to get ride of excess sparkles), we stuck them on the kids’ bedroom wall for that little Christmassy touch.


It’s beginning to look a lot like Christmas. ;)

A time to craft, a time to give

I had a lovely time crafting with some other crafty mamas last week.

It. Was. Therapeutic.

We were all so focused on learning new tricks from mama J, and one another, and checking out all her cool crafty toys!

Like a little craft party. Chatting and crafting.

I sometimes wonder why I carve out time to do this, like, don’t I have something else better to do (like run last-minute baby-related errands)?

But seriously, I can’t think of a more meaningful way to spend the days leading up to Christmas (or till the day I pop). And I thought Vera will also have fun chipping in in small ways, and she’s at a good age to be learning about giving and putting other people’s needs ahead of our own. ;)

Plus like I said…It. Is. Very. Therapeutic. And so it must be good for my body, soul and even baby.

Here is the first set of cards I have. They are priced at a set of 4 for $10. If you see something you like and want to place an order, you can leave a comment or email me at mamawearpapashirt @ gmail.com!


We’re also calling out for donation of scrap materials so if you wish to contribute to this project, please get in touch too.

All proceeds will go to a local charitable organisation to help children with special educational needs. (The name is under wraps at the moment, as we are still applying for the relevant permits.)

In the coming days/weeks, I will be uploading more card designs onto the Facebook page, so stay tuned.

Here are the other mamas involved in this project. Do look out for updates on their blogs too in the coming weeks.

A Dollop of Me
Mummy Wee
Tan Family Chronicles
A Juggling Mom


Do we need a reason to give? Is it only during Christmas that we start to share our blessings around? Not really…The only reason is love. Love without boundaries.

Thank you for supporting this cause! And please spread the word and love around. :)

UPDATED: Check out new designs for mother’s day here!

PS. Special thanks goes to Claudia from The Loving Mum who contributed the craft materials.

Little Lessons: Beauty happens when we least expect it

Vera’s artwork never fails to bring a smile to my face, especially her recent ones…

We do leaf prints from time to time. One day, she transformed her red leaf print into a strawberry, just by adding black dots with a pencil.

from leaf to strawberry

Another day, I returned home from work to find this. Her portrait of our family, with Javier, herself (with the long crazy hair), and…little baby Joshua! I was most surprised to find that she is already including baby #3 into the mix…I take it to mean that she just can’t wait to welcome him into the family. :)

I love her colours… (Left: “hairy” fireworks. Right: colourful ice-cream cones filled with purple and yellow rolled-up paper tissue, and topped with a Cornetto-style cover.)

Finally, this drawing of herself, with long earrings (yes she’s girly like that), and rainbows and flowers - just a handful of her favourite things. It now hangs on our family photo wall in our master bedroom.

I know I sound like “proud mama” all over this post, but I can’t help it.

These may not be Picasso, but they are lovely works by the hands of my little girl. Through the bright colours and happy expressions on her drawings, I see her joy and zest for life.

I can also recall three things I learnt from an art workshop long ago. [Read: Every child can draw]

  1. There are only two areas where a child can be free and enjoy full control. One of them is play, the other is art.
  2. A supportive environment is all you need to help grow your child’s interest in art.
  3. Allow your child to enjoy the creative process, and refrain from judging the outcome.

I’ve never placed much expectations or pressure on her to colour well, or to draw something neatly, or to paint a logical scene. To the adult eye, her art may come across messy and unrefined, but I enjoy hearing her talk about her work, her craft, and seeing how proud she is of them.

I hope to cheer her little passion for art on simply by being there…and by allowing her to make her own choices and explore freely with different materials/medium.

May the creativity and imagination of our children thrive. And may we adults learn to never hinder, judge or discourage this beautiful process.

This is the post #6 of the Little Lessons series – because as parents we are always learning with and from our children. If you want to follow the entire series, you’ll find each new post listed here every week.

mamawearpapashirt

<div align="center"><a href="http://www.mamawearpapashirt.com/category/little-lessons-2/" title="mamawearpapashirt" target="_blank"><img src="http://www.mamawearpapashirt.com/wp-content/uploads/2013/09/Little-Lessons.jpg" alt="mamawearpapashirt" style="border:none;" /></a></div>

50 Greatest Photographs of National Geographic at the ArtScience Museum

“A true photograph need not be explained, nor can it be contained in words.” - Ansel Adams

NatGeo Afghan woman

You might recognise this famous photograph of an Afghan girl (left), taken by Steve McCurry for a cover of National Geographic. The word “haunting” has been used to describe her eyes, eyes that had seen too much horror for a young lady. The photograph on the right is the same woman, 17 years later.

At the 50 Greatest Photographs of National Geographic exhibition, I came in touch with photographs that were engaging, compelling, and insightful, revealing the inner lives of people and animals across the globe.

Below is a series of photographs, made up of panoramic shots, of an underground cave in the Bahamas. It’s amazing what professional photographers will do to pursue their passions, including exposing themselves to a certain degree of danger. Apparently, these underwater caves had never been explored before this expedition.

This is a photograph of a sleeping Tuareg family in Sub-Saharan Mali. The photographer, Joanna Pinneo, had actually travelled to Mali to see how the drought was affecting Tuareg nomads. The trip led to her meeting a local family, and she was actually invited into their home. This was how she managed to capture this intimate moment.

This photograph of some wandering, lost camels shrouded in fire and darkness was actually taken in the day-time. But the smoke and fumes from the destruction of war make it seem like it was taken at midnight!

This photograph of a polar bear was taken blind. The photographer simply rowed his boat closer to the bear, and put his camera into the water and clicked. Amazing how even such “accidental” photographs can be so beautiful.

What I really like about the exhibition is how it gives a better understanding of the way people and animals lived in their original habitats, and also how humans and animals interact or impact on the other.

This one below of Jane Goodall, a British primatologist, bowing to a chimpanzee named Jou Jou who was seeking some attention and affection, was particularly touching.

We also had a chance to make our own photograms! This simple workshop aims to imparts basic darkroom techniques to participants, and allows visitors to create their own photograms using traditional print photography methods.

Here is my photogram composition (left), and how it turned out on the photographic paper (right). It was quite fun for me to experience the darkroom again (having gone through a photography module once). It would definitely engage the older kids aged 6 and above.

This 50 Greatest Photographs of National Geographic is running at the ArtScience Museum until 27 October 2013. If you prefer a guided tour to learn about the stories behind the iconic photographs on display, tours are provided complimentary every Sunday, 11:30am-12:30pm, on a first-come-first-served basis.

The ArtScience Museum is also running a “What’s Your Story” contest, on Facebook. Do check it out, as you’ll stand to win a S$500 shopping voucher and a 1 night’s stay at Marina Bay Sands!

How to make a simple DIY lantern for Mid-Autumn

It’s Mid-Autumn festival this week! Have you been enjoying mooncakes with your family?

We spent our previous weekend making and decorating a simple paper lantern.

Here’s what you’ll need:
1. A4 coloured paper
2. Clean cake boxes (or any other thin cardboard material)
3. Paint (or old pieces of artwork)
4. Scissors, pencil, double-sided tape and craft glue
5. Clean wooden chopsticks

Step 1: Make diagonal folds on an A4 coloured paper, starting at one corner and working your way to the end. Unfold and do the same starting from the opposite corner. Unfold, and you’ll get nice regular diamond shapes throughout the paper.

Step 2: Decide with your child how you wish to decorate the lantern. For instance, Javier likes ladybugs, and I got him to stick black circles at intervals all around the paper. (It’s easier to do this when the paper is flat, rather than after it’s rolled into a circular lantern shape at the next step.)

Step 3: Roll up the paper and fasten the ends with a double-sided tape. This forms the body of the lantern. *You may need to help your child with this, and it’s not easy to stick the ends together without creasing the paper.

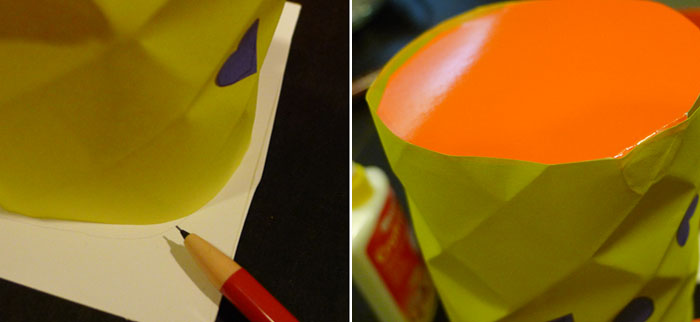
Step 4: Place the circular end of the lantern on a thin piece of cardboard (I used an old cake box I had lying around). Use a pencil to trace the circumference. I found that the double sided-tape matched the size of the circular base, so you can use that too as it forms a more perfect circle. Draw 4 extra rectangular strips sticking out from the circle. (These extra strips will be folded in later and stuck to the inside of the lantern.)

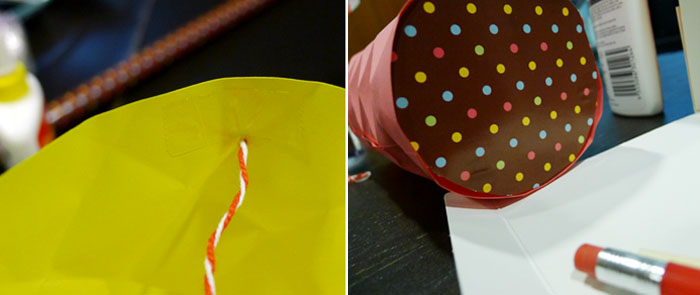
Step 5: Cut the circle out together with the 4 rectangles. Use double-sided tape to attach the rectangles to the inside of the lantern. (Optional: You may decorate the base with some coloured wrapping paper, by sticking it on and cutting around the edge.)

Step 6: Use a pin or sharp pencil to poke two holes at opposite ends of the lantern. Fasten a piece of tape just above the hole to prevent tearing. Insert a string and tie the ends. This string will be wound around the end of a chopstick later on.

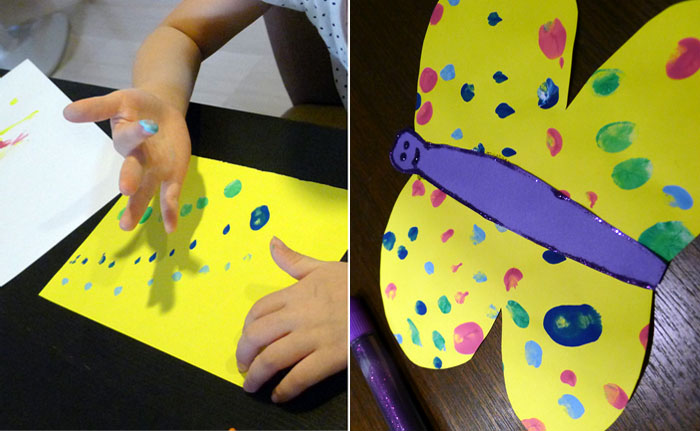
Step 7: Re-use old artwork done by your child, by cutting it up into the shape of a butterfly (or another animal if you like). Decorate it with glitter glue or other art materials that you have around the house.

Step 8: Fasten the decorated butterfly onto the lantern body with double-sided tape.

Step 9: Use some craft or super glue to attach a tea-light candle to the base of the lantern. *Because the lantern has a tall body, it’ll be easier to light the tea-light using a lighted candle instead of a lighter.

Step 10: Wind the string around the end of a chopstick and use a drop of craft glue to help secure it.

Here’s our happy butterfly lantern! If you’re looking for more fun family activities to do, go get your hands on Focus on the Family’s free downloads.

Happy Mid-Autumn, folks! :)

Happy butterfly lantern

Related Posts Plugin for WordPress, Blogger...